Skateboard Ramp Plans
Skateboard ramp plans can be simple. I have a learned a lot about how to build them. Through trial and error and came up with a few useful steps. That make it easier and cheaper to build. I even used some engineering to calculate how strong they are. My designs are tough enough to survive years of skating and last through a Canadian winter.
In this article I will talk about general steps for all skateboard ramp plans. There are a few important things to know that will make or break the final product. The main groups to think about are:
- Materials
- Design
- Maintenance
After these basics I will send you off to the individual skateboard ramps you are looking for. I ask for your patience while I build each page.

Choosing the Right Materials
Tools
A most basic set of tools to build:
- 25' measuring tape
- Power drill
- Circular saw
- Jigsaw
- Carpenters square
- A pencil or marker
If you are good with tools you can get by with that. If you have a little more money then get a miter saw and a chalk line. The sky is the limit for other tools too.
The basic materials
For wood ramps:
- 2x4's
- 3/4" or 1/2" 8x4 plywood for structure
- 3/8" 8x4 plywood for covering
- 1 1/2" deck screws
- Pick your skating surface
- Glue
- Paint or seal
The materials vary depending on what is being done.
Fasteners
I use 1 1/2" deck screw because they are strong and durable. They have a Robinson (square) bit that does not strip . So you can take them out and put them back in for repairs. If you want to get picky you can use 3" deck screws for the structure and 1" ones for the sheathing.
It is best to use ones that are threaded all the way up the neck for the sheathing. They grip the sheets better over time. I wouldn't recommend drywall screws. They are weak and will wear just from having a skateboard roll over them. The heads can pop off and you will have to replace the screw.
If you are using masonite a pneumatic stapler will give you the best finish. Use 1/2" long x 1/4" wide staples. Something long enough to get good grip and wide enough that they don't pinch the skating surface. Pneumatic staplers can be rented for the few hours. It is quicker and cleaner than screwing it down. Without the worry of finding a cross brace for the screw to catch. It is quick and fun to snap down a sheet.
Taking off a stapled sheet is easy to. It pulls off like a zipper. You can pop the staples out with a hammer and use the sheet again without big screw holes.
Cut lists
An accurate list of materials is important to have. Counting the number pieces and length of cuts. It can speed things up if you have all the right pieces cut and ready before you start to assemble. Especially when you go to buy the material.
Design - Getting the transition right
Choosing a transition
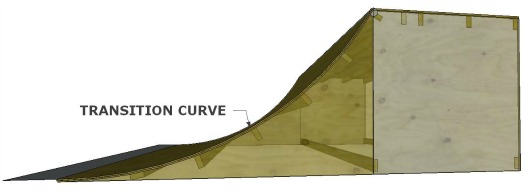
The transition is the steepness and curve of the ramp. Check here for details on what different types of tranny. I also give you a simple way to draw and cut a transition. This can get pretty involved so I think it deserves a whole page on its own.

Foundations
Foundations for skateboard ramps are important and often overlooked. For indoor or outdoor you need to have a good connection with the ground for a solid ramp. You do not need to fasten the ramps to the ground or floor though. If built they ain't gonna move. Unless you want them to.
Keep outdoor ramps "portable". Outdoor ramps can get wet and rot with improper contact with the ground. You may want to move one day and take the ramp with you. There may even be legal reason not to build a permanent structure.
Many places will have by-laws that restrict the use of permanent structures like ramps on your property. That means that the city where you live could force you to tear down what you have built. It is best to avoid those things and make the structures non-permanent.
The bonus to this is that it will be an easier job and cheaper to build them non-permanent.
Use compacted structural sand with precast concrete piers and pressure treated 4x4 posts. Like you would for building a deck. Install a few of these in the right spots and you will have a solid ramp. One that can be disassembled and moved without destroying the area.
The basic structure
The basic structure of a good skateboard ramp plan will be: Plywood templates of the shape of the ramp on each end.
2x4 or similar members spanning from one template to the other.
Braced every 4' or so with another plywood sheet.
Then covered with thin plywood that will take the shape of the ramp in a few different layers.
Don't worry. I will show you how.
Connections
Connections are how you attach the different parts of the ramp together. Two deck screws are what I use. Secondary support and bracing made by other parts of the ramp add more stability. I have not seen structural problems on ramps that I build, even after 5 years of use. I did a structural analysis once in college. It turned out the skateboard ramps I made were well equipped to handle to abuse of any skateboarder.
The forces created from skateboarding are not that huge. If you feel the need to beef up the structure then there are a few options. Screw blocks in underneath the main horizontal beams. Use joist hangers[not recommended]. Use glue in the joints.
Types of coping
What is coping? Look here for the lowdown and comments on personal preference. Again, a big subject. Go here for in depth description and then come back to this page after.
Picking the skating surfaces
Depending on your budget there are many options for the surface of your ramp. Skatelite is an expensive material that last well against skateboarding. It handle getting wet from rain. Masonite is available everywhere and work great for skateboarding. It does not do well when it gets wet.
Maintenance - Making it last
To prevent wear and water damage I like to use a few final touches to make the ramps last way longer. My skateboard ramp plans will make your ramps last outdoors. To do this you need to protect them with paint or water seal, give them proper slope, drainage and more.
Sealing the Ramp
Sealing and gluing the ramps in all the right places will make the difference. These are simple and quick things you can do that will keep the ramp going far longer than most others.
White glue is all you need to make the ramp feel solid. Once you have set the ramp up and worked it in. Set it with glue. You can use plain white glue to set the connections in solid. Be sure the everything is just the way you like it. Run a bead of glue into and along the lower and upper gap of the coping. If you want the ramp to stay that way pretty much permanently place some glue in all the squeaky cracks you can find. This will make your ramp one big piece of shredding glory. In some cases it will be tough to take apart. So think about whether you want things permanent before you drench the ramp.
Glue is also a great protector from excessive wear. On the part of the ramp that meets the ground you can brush and smother the areas that get the most wear with white glue. It will seal and protect the wood from wear. It is so easy to do and adds a huge amount of life to the lip of the ramp.
Water drainage
It is very important that you set any level surface at a slight angle to drain water away. 1-2% should be good. If you don't then your ramp will always hold water on it a rot away before your eyes. I had this problem for years and didn't clue in until it was too late. Just slope it away from the skating in a reasonable and small slope. That will allow drainage and keep things dry and lasting longer.
In some cases drill a drain hole to get rid of pesky puddles. Only watch out for insects looking for a place to nest in the holes.
Air Circulation
It is good to have some air circulation to the inside of the ramp. This will keep it a little drier on the inside. If you drill holes for drainage and handles that should be enough. Be sure that insects don't nest in the holes. Clean them out once in a while to keep the bees away.
Get the Details Here
Now that you have some general tips and guidelines you can get into the basic ramps on these other pages. Each one will have some diagrams and instructions on how to build the ramp. Get out these ramps:
Rail, Ledge, Jump Ramp, Quarterpipe, and Halfpipe. Good Luck!
Return from Skateboard Ramp Plans to Skateboard Ramps
Return from Skateboard Ramps to skateboardhere homepage